
The first time you crack open a PC case, the SSD looks small enough to be harmless. It isn’t. One wrong move with a screwdriver, one forgotten power cable, or one static shock from your fingertip can turn a five-minute job into a dead drive and a bad afternoon.
M.2 vs 2.5-Inch SATA: Know Your SSD Before You Touch It
You cannot remove what you cannot identify. SSDs come in two physical shapes that share almost nothing in common except the name.
M.2 SSDs look like bare sticks of gum with exposed chips. They sit flat against the motherboard, held down by a single tiny screw at one end. The connector is a row of gold pins that slides into a slot. M.2 drives use either the NVMe protocol (fast, PCIe lanes) or the SATA protocol (slower, same as the bigger drives). The physical removal process is identical for both.
2.5-inch SATA SSDs look like miniature hard drives in a metal or plastic enclosure. They connect via two cables: a narrow SATA data cable and a wider SATA power cable. These drives mount into a bay or bracket inside the case, typically secured with four screws.
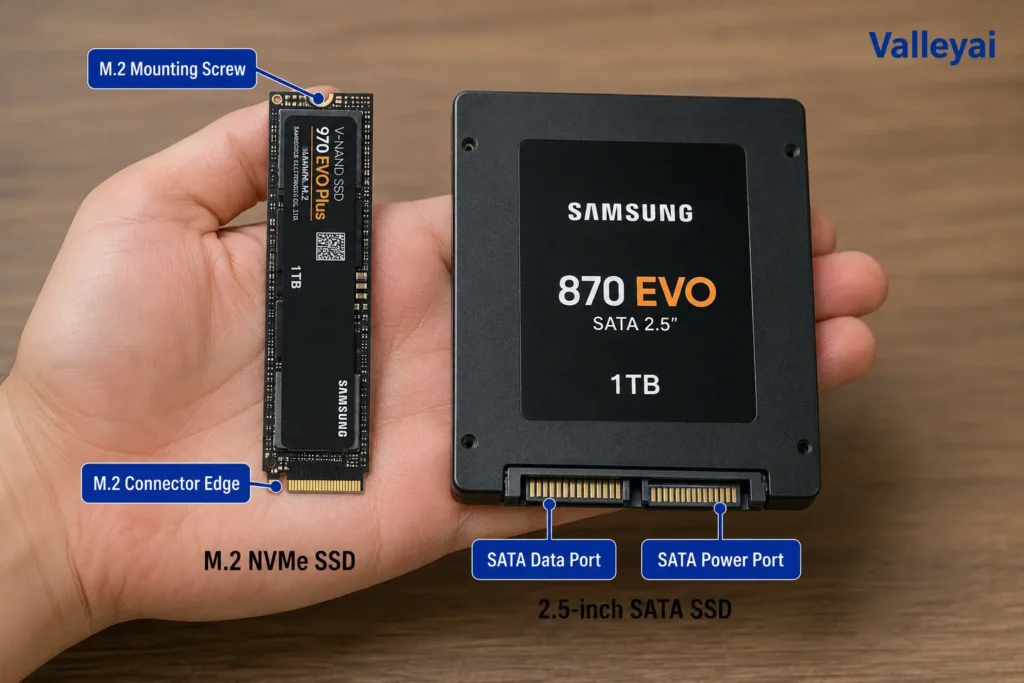
If you are unsure which type you have, shut down the PC, open the side panel, and look. A stick-shaped drive directly on the motherboard is M.2. A boxy drive with cables attached to it is a 2.5-inch SATA drive. No software needed.
Before You Open the Case: A 3-Minute Safety and Tool Checklist
Skipping this section is the hardware equivalent of changing a car tire without the parking brake on. The damage is invisible until it is permanent.
Shut down and unplug. Do not sleep or hibernate. Full shutdown. Then disconnect the power cord from the back of the power supply.
Drain residual power. After unplugging, press and hold the PC’s power button for 10 seconds. You will hear nothing, but the capacitors on the motherboard will discharge. This is especially important on modern boards where RGB lighting stays lit even when the system is off.
Ground yourself. Electrostatic discharge destroys SSD components at voltages you cannot feel—as low as 30 volts. Touch a bare metal part of the case (not painted) before reaching inside. If you live in a dry climate or work on carpet, wear an anti-static wrist strap clipped to the case frame. At minimum, avoid wearing wool sweaters and petting your cat mid-repair.
Tools you actually need:
- Phillips #0 screwdriver: For the M.2 mounting screw. A #1 is too big and will round the head.
- Phillips #1 screwdriver: For case side-panel screws and SATA drive caddy screws.
- Magnetized tip (optional but borderline essential): The M.2 screw is 2mm wide and will disappear into a PSU shroud the moment it slips. I keep a dedicated magnetized #0 on my bench for exactly this reason. A $5 tool saves 15 minutes of crawling on the floor with a flashlight.
- Tweezers: For retrieving a dropped M.2 screw from the motherboard. Metal tweezers are fine just do not scratch the PCB.
- Small container: To hold screws so they do not roll off the desk.
If you are removing the SSD from a laptop, add these:
- Torx T5 bit: Some laptops (looking at ThinkPads and older MacBooks) use Torx screws for the bottom panel.
- Plastic spudger or old credit card: For prying the bottom panel without gouging the plastic.
- Patience: Laptop bottom panels hide screws under rubber feet, under warranty stickers, and sometimes under the keyboard bezel. Run your fingernail around every rubber pad and sticker before pulling. That last missed screw is how bezel clips get cracked.
Opening your PC may void warranties. Check your manufacturer’s policy. The steps here are general guidance; your specific hardware may differ.
Removing an M.2 SSD (Desktop and Laptop)
The M.2 removal process is mechanically simple but physically unforgiving. The screw is small, the slot is delicate, and the standoff underneath is easy to strip.
Step 1: Locate the M.2 slot. On a desktop motherboard, it is usually between the CPU socket and the first PCIe x16 slot. On a laptop, it is under the bottom panel, often near the center or the battery.
Step 2: Identify obstructions. An M.2 drive might sit directly under a graphics card. If you cannot reach the screw, remove the GPU first. Remove the GPU power cable, unscrew the PCIe bracket from the case, push the PCIe slot latch, and lift the card straight out. Set it on a non-conductive surface.
Step 3: Remove the M.2 heatsink, if present. Many modern motherboards and high-end NVMe drives have a metal heatsink covering the SSD. Unscrew the heatsink screws (usually two small Phillips heads) and lift the cover off. Underneath, you will find a thermal pad pressed against the SSD. The thermal pad often tears when you peel the heatsink off. If it stays in chunks covering the controller and NAND chips, reuse it as-is. You do not need a new pad unless it has dried to a crumbly texture. If the pad sticks to the SSD instead of the heatsink, leave it there it will not hurt anything.
Step 4: Remove the single M.2 mounting screw. This is the screw at the end of the drive opposite the connector. It threads into a small brass standoff on the motherboard. Use your Phillips #0 driver. Turn counterclockwise slowly. If the screw head starts to round, stop immediately. Place a rubber band flat between the screwdriver tip and the screw head, then try again. The rubber fills the stripped gaps and provides enough grip.
Step 5: Remove the SSD. Once the screw is out, the drive will pop up at a slight angle M.2 slots have a spring tension mechanism. Do not yank it straight out. Grasp the drive by the edges, lift it to about a 30-degree angle, and pull it gently away from the slot. No force is needed. If it resists, check that the screw is fully removed and that no heatsink bracket is still holding it.
Step 6: Store the screw. Put the M.2 mounting screw back into the standoff on the motherboard, or drop it into your container. If you ever reinstall an SSD in that slot, the missing screw is the one thing you will not have a spare of.
Removing a 2.5-Inch SATA SSD
SATA drives are larger and have more connectors, but the process is mechanically simpler. The risk is not in the removal but in forgetting what is connected where.
Step 1: Trace the cables. A SATA SSD has two cables a thin data cable and a wider power cable. Follow both cables to their sources. The data cable connects to a SATA port on the motherboard. The power cable connects to the power supply unit (PSU). Note which ports they use; you may need to reconnect them later.
Step 2: Disconnect the cables. Pull the connectors straight out. Do not wiggle side to side. SATA connectors have a small latch on the top; press it down before pulling. If the latch is broken or missing, the connector should still pull free with gentle, even pressure. The SATA power connector is sometimes stiff enough to make you think it is glued. It is not. Rock it gently up and down not side to side and it will come loose.
Step 3: Remove the drive from its mount. In a desktop, the SSD is likely held in a 2.5-inch drive tray or bracket. Remove the four screws (two on each side) that secure the drive to the tray. Some cheaper cases use plastic snap-in brackets that need no screws look for release tabs. In a laptop, the drive is often held by a single screw and a SATA connector soldered directly to the motherboard. Once the screw is removed, slide the drive straight out of the connector.
Step 4: Handle the drive carefully. SATA SSDs are more durable than mechanical hard drives, but the exposed PCB on the bottom of some models is still vulnerable to static. Hold the drive by its metal edges.
What If the SSD Was Your Windows Drive? Post-Removal Boot Strategy
Pulling the system drive and expecting the PC to boot normally is like removing the engine and expecting the car to start. The motherboard will look for a bootable device and find nothing.
What happens: You will see a black screen with text reading “No bootable device found,” “Reboot and select proper boot device,” or a BIOS/UEFI screen that appears automatically.
Is this a problem? Not if you expected it. If you are replacing the drive, you can install the new blank SSD and then install Windows from a USB stick. The motherboard will find the USB drive and boot from it automatically if no other bootable drive is present.
If you want to keep the old SSD’s data intact and boot from a different drive, you need to enter the BIOS/UEFI. Press the boot menu key during startup (F2, F8, F11, F12, or Del—your motherboard’s manual or a quick online search will tell you which one) and select the new boot drive from the list. Then go into the BIOS/UEFI settings and change the boot order so the new drive appears first. Save and exit.
If you have BitLocker or other drive encryption enabled, you will need the recovery key. Without it, the data on the removed drive is inaccessible. Back up your BitLocker key to a Microsoft account or a USB drive before removing the SSD. Losing the key means losing the data permanently.
When the SSD Won’t Budge: Stubborn Screws, Hidden Latches, and Glued Laptops
Some hardware fights back. Here is what to do when the standard steps fail.
The M.2 screw is stripped. Use the rubber band trick described above. If that fails, place a flat piece of duct tape sticky-side up over the screw head, press the screwdriver firmly into the tape, and turn. The tape fills the stripped grooves. In extreme cases, a tiny drop of superglue on the tip of a disposable screwdriver (bonded to the screw head) can work but this is a last resort that risks ruining the screwdriver and the motherboard if glue drips.
The SATA power cable won’t release. The connector has a latch on top. If the latch is hidden against the drive body, use a flathead screwdriver to gently press it down. Do not pull the cable by the wires pinch the plastic connector body.
The laptop bottom panel has hidden screws. Check under rubber feet (they peel off and re-stick), under the battery, and under any stickers or labels. Some laptops have a screw directly under the keyboard bezel that requires removing the keyboard first. If the panel is not coming off after removing all visible screws, you are missing one not stuck.
The laptop bottom panel is glued. Some ultrabooks especially Dell XPS models and older HP Spectres use adhesive strips instead of screws. Insert a plastic spudger between the panel and the chassis, then run it around the perimeter to break the adhesive. Do not use a metal screwdriver; it will gouge the aluminum. If the panel lifts unevenly, reheat the edges with a hairdryer on low heat to soften the adhesive. This is the point where you realize the repair is more involved than a YouTube tutorial made it look. If the panel feels like it is bending, stop and reassess.
The SSD is soldered to the motherboard. Some laptops MacBook Air M1 and later, Microsoft Surface devices, and many Chromebooks have storage chips soldered directly to the board. There is no SSD to remove. If you open the laptop and see no removable drive, you are looking at a soldered-storage device. Close it back up. The SSD is not coming out without a rework station and a professional microsoldering setup.
What to Do With the Removed SSD
A removed SSD still contains your data. Throwing it into a drawer and forgetting about it is a security risk.
If you plan to reuse the drive in another PC or as an external drive, buy a USB-to-SATA adapter or an M.2 NVMe USB enclosure. Both are cheap and turn an internal SSD into a portable drive in seconds. The M.2 enclosure needs to match the drive’s protocol NVMe enclosures and SATA enclosures are not interchangeable.
If you plan to sell or discard the drive, perform a secure erase first. For SATA SSDs, use the motherboard’s built-in secure erase function in the BIOS or a tool like the free version of Parted Magic. For NVMe drives, use the NVMe format command in the UEFI or a Linux live USB with nvme-cli. A simple reformat in Windows does not erase the data it only marks the space as available. The data remains recoverable until those blocks are overwritten.
If the drive is dead and you cannot erase it, physical destruction is the only option for guaranteed data security. Drilling a hole through the NAND chips works, but wear safety glasses. Better yet, take the drive to an electronics recycling facility that offers data destruction certification.
Frequently Asked Questions
Do I need to unplug my PC to remove an SSD?
Yes, absolutely. You must shut down the PC, unplug the power cord from the wall or the PSU, and press the power button for 10 seconds to drain residual charge. Removing an SSD from a powered-on system can cause electrical shorts and permanently damage both the drive and the motherboard. Do not risk it.
Is it safe to remove an SSD while the PC is on?
No. SATA SSDs are not designed for hot-swapping in a consumer desktop environment. M.2 SSDs are never hot-swappable. Pulling a drive while the system is running can corrupt data, fry the drive’s controller, or damage the motherboard’s SATA or PCIe lanes. Always shut down first.
Can I just pull the SSD out?
No. M.2 SSDs have a mounting screw that must be removed first. Pulling without removing the screw will damage the slot and possibly crack the SSD’s PCB. SATA SSDs have cables that must be disconnected before the drive can be removed from its mount. Yanking a cable by the wires can break the connector or the cable itself.
What tools do I need to remove an SSD?
For an M.2 SSD, a Phillips #0 screwdriver is the only essential tool. A magnetized tip helps prevent losing the tiny screw. For a SATA SSD, a Phillips #1 screwdriver handles the case and drive mount screws. If you are working on a laptop, you may also need a Torx T5 bit and a plastic spudger for the bottom panel. A container to hold screws is strongly recommended.
How do I remove an SSD from a laptop?
The process depends on the laptop model. For most laptops with removable bottom panels, remove the screws, pry off the panel with a plastic spudger, and then follow the standard M.2 or SATA removal steps. Some laptops require removing the keyboard or battery first. If the laptop has a glued bottom panel, use a hairdryer to soften the adhesive before prying. If the SSD is soldered, it cannot be removed by the user.
What happens if I remove the SSD that has Windows on it?
The PC will not boot. You will see a “No bootable device” error. This is normal. If you want to boot from a different drive, enter the BIOS/UEFI and change the boot order. If you are replacing the drive, install the new SSD and then install Windows from a USB installation drive. If BitLocker is enabled, you will need the recovery key to access the data on the removed drive.
How do I safely remove an SSD without damaging it?
Work on a non-carpeted surface. Ground yourself by touching bare metal on the case. Use the correct screwdriver size to avoid stripping screws. Never force a connector or a drive if it resists, check for a hidden screw, latch, or clip. Store the drive in an anti-static bag if you are not reinstalling it immediately.
New to SSDs? Start with our complete guide: What Is an SSD? How Solid-State Drives Work (2026 Guide)

Kaleem
Kaleem is a Computer Science graduate (Virtual University of Pakistan) and the founder and editor of Valley AI, where he publishes in-depth, tested guides on computer hardware, artificial intelligence, and how the internet works. Every guide is researched from primary sources, tested hands-on where possible, and updated when the facts change.