Every component in your PC is useless without one thing connecting them. Not the CPU. Not the power supply. The motherboard and most people don’t understand what it actually does until something goes wrong.
The Central Nervous System of Your Computer: Motherboard
A motherboard is the main printed circuit board (PCB) that physically and electrically connects every component in your computer. Your CPU sits on it. Your RAM slots into it. Your GPU plugs into it. Your storage drives connect to it. Your power supply feeds it. Without the motherboard, none of these components can communicate, receive power, or function as a system.
The term “motherboard” has been around since at least 1965. IBM called theirs a “planar” board in the original PS/2 systems. Apple still calls it a “logic board.” Intel’s documentation says “baseboard.” The hardware is the same the naming just reflects which company wrote the manual.
What makes a motherboard different from a random circuit board is that it’s the host board the one that everything else connects to, rather than connecting to something else.
Three Things a Motherboard Actually Does
Strip away the jargon and a motherboard has three core jobs.
1. It routes data between components.
Your CPU needs to send instructions to your RAM, retrieve data from storage, and push rendered frames to your GPU. None of that happens through direct cables it happens through the motherboard’s data pathways, controlled by the chipset. The chipset is essentially a traffic controller, deciding which data goes where and how fast.
2. It distributes power.
Your power supply sends 12V, 5V, and 3.3V rails to the motherboard. The motherboard then converts and distributes that power to every connected component but not before the VRM (Voltage Regulator Module) steps it down to the precise voltages each component needs. Your CPU might need 0.8V to 1.4V depending on load. The motherboard handles that conversion.
3. It runs the firmware that starts everything.
Before your operating system loads, before your CPU executes a single application instruction, the motherboard’s firmware technically UEFI, though most people still call it BIOS runs a startup sequence called POST (Power-On Self-Test). It checks that all connected hardware is present and responding, then hands control to your OS bootloader.
That’s it. Data routing, power distribution, and boot orchestration. Everything else on a motherboard exists to support those three functions.
What’s Actually on the Motherboard: A Component Map
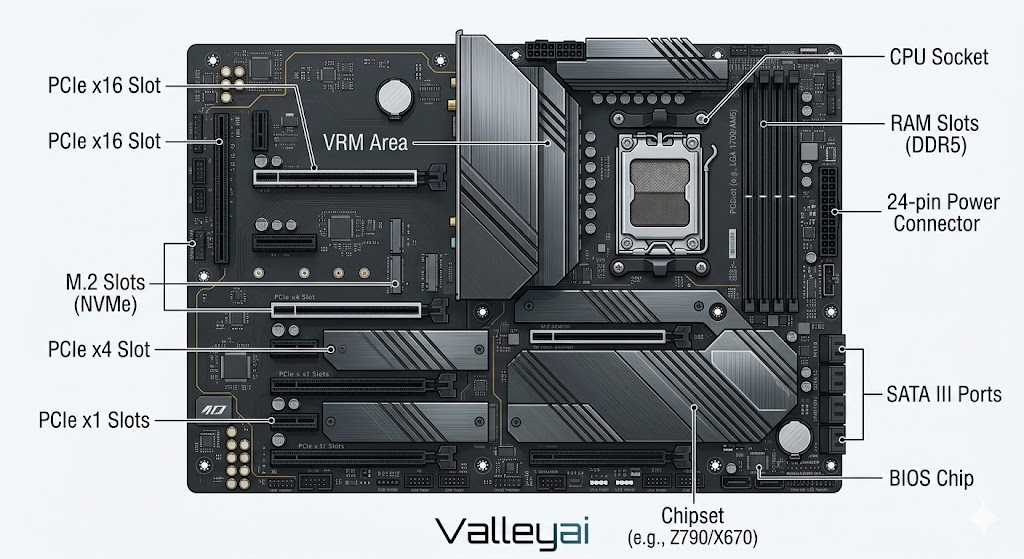
The physical layout of a motherboard can look overwhelming, but every element has a specific purpose.
| Component | Function | Why It Matters |
|---|---|---|
| CPU Socket | Holds and electrically connects the processor | Determines which CPUs are compatible and locks you in |
| RAM Slots (DIMM) | Hold memory modules | Determines max RAM capacity and speed support |
| Chipset | Routes data, controls PCIe lanes and I/O | Defines feature set: overclocking, USB count, storage options |
| VRM (Voltage Regulator Module) | Converts and stabilizes CPU power delivery | Quality directly affects stability under load and overclocking headroom |
| PCIe Slots | Connect GPU, capture cards, expansion cards | Slot version (Gen 3/4/5) determines bandwidth |
| M.2 Slots | Connect NVMe SSDs directly | Faster than SATA; slot version affects read/write speeds |
| SATA Connectors | Connect traditional SSDs and HDDs | Standard storage interface, slower than M.2 |
| 24-pin ATX Connector | Main power input from PSU | Standard power delivery; all boards use this |
| 8-pin / 4-pin CPU Power | Dedicated CPU power input | Feeds the VRM; more pins = more headroom for high-wattage CPUs |
| BIOS/UEFI Chip | Stores firmware | Persists settings after power-off; required for boot |
| I/O Ports (rear panel) | USB, audio, video, networking | External connectivity; varies by board tier |
Most of these components are soldered directly to the PCB you can’t replace them individually if one fails. That’s why board quality matters more than it looks.
How the Chipset Controls Everything You Can Do
The chipset is the most misunderstood component on a motherboard. It’s not just a “helper chip” it’s the gatekeeper for most of your board’s features. Modern processors contain billions of transistors a direct result of integrated circuit miniaturization that began in 1958.
Historically, motherboards had two chips: the Northbridge (handling high-speed connections between CPU, RAM, and GPU) and the Southbridge (handling slower I/O like USB, SATA, and audio). Modern processors have absorbed most Northbridge functions directly into the CPU die. What remains is a single Platform Controller Hub (Intel) or Fusion Controller Hub (AMD) still called “the chipset” by everyone.
The chipset tier you choose determines:
- Whether overclocking is possible
- How many PCIe lanes are available for storage and expansion
- How many USB ports are natively supported
- Which CPU generations are compatible
Intel’s current chipset tiers (as of 2024–2025):
| Chipset | Overclocking | PCIe Gen 5 Support | Target User |
|---|---|---|---|
| Z790 | ✅ Yes | ✅ Full support | Enthusiasts, overclockers |
| B760 | ❌ Locked | ⚠️ Limited | Mainstream builders |
| H770 | ❌ Locked | ⚠️ Limited | Budget / OEM |
AMD’s current chipset tiers (as of 2024–2025):
| Chipset | Overclocking | PCIe Gen 5 Support | Target User |
|---|---|---|---|
| X870E | ✅ Yes | ✅ Full support | High-end enthusiasts |
| X870 | ✅ Yes | ✅ Yes | Enthusiasts |
| B850 | ✅ Yes (limited) | ✅ Yes | Mainstream builders |
| B650 | ⚠️ Limited | ⚠️ Partial | Budget mainstream |
One thing most guides won’t tell you: B-series boards aren’t inferior they’re feature-locked. A B760 board with a quality VRM will run an i7-13700K without issue. It just won’t let you push the CPU beyond its stock boost clocks. That’s a firmware decision Intel made to protect Z790’s market position, not a hardware limitation.
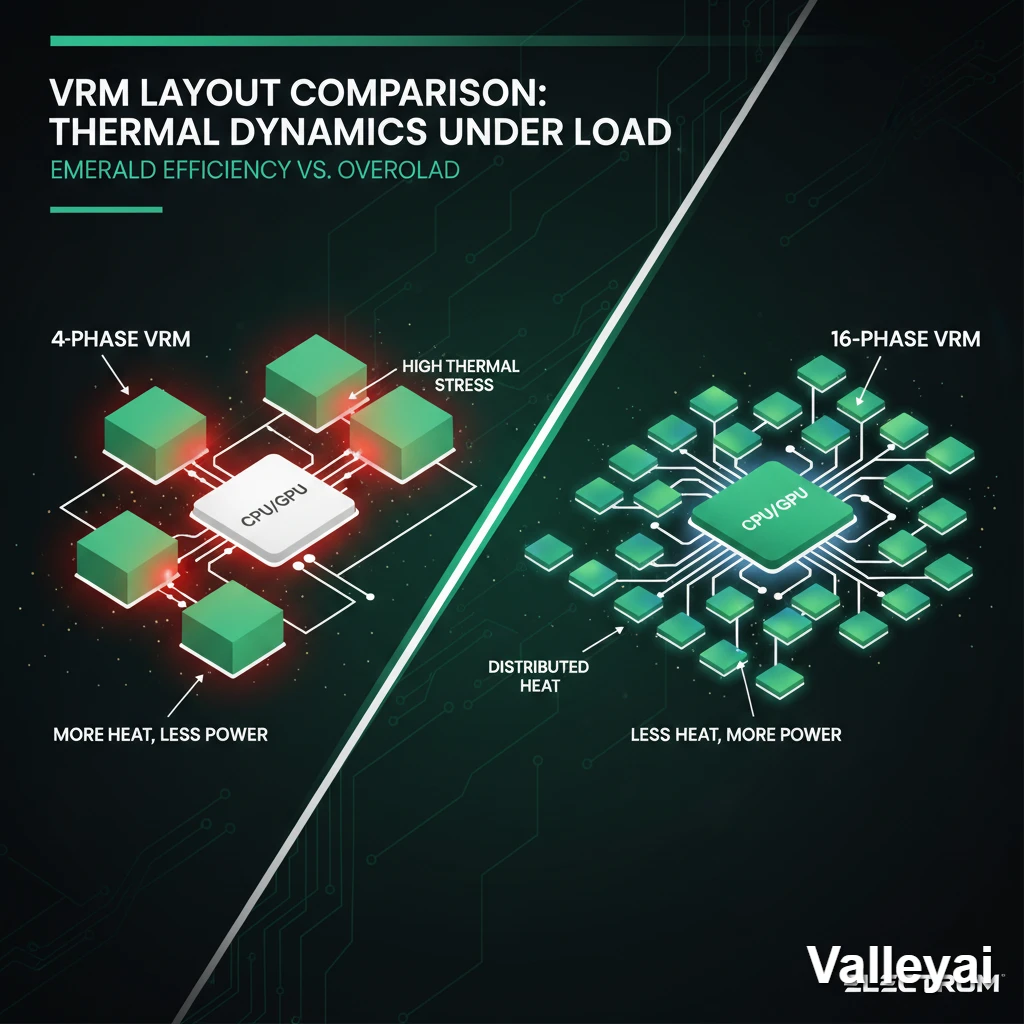
The Real Reason Expensive Motherboards Exist: VRMs Explained
The VRM (Voltage Regulator Module) converts the 12V from your power supply into the lower, precise voltages your CPU needs anywhere from 0.8V to 1.4V depending on the workload. The CPU doesn’t draw a constant voltage; it fluctuates rapidly based on load. The VRM’s job is to track those fluctuations and respond fast enough to keep voltage stable.
A VRM consists of phases each phase is a set of components (MOSFETs, inductors, capacitors) that share the current load. More phases means each phase handles less current, runs cooler, and responds faster.
A cheap 4-phase VRM on a $80 board can deliver stable power to a 65W CPU at stock settings without breaking a sweat. Put a 125W processor on it and push it to 5.2GHz, and you’ll see one of two things: thermal throttling (the VRM overheats and reduces power delivery to protect itself) or voltage droop (the voltage sags under load, causing instability or crashes).
A quality 16+2+1 phase design on a $200 board distributes that same load across far more components. Each phase stays cooler. Voltage stays tighter. The CPU gets what it asked for, consistently.
Here’s something that took me longer than it should have to understand: the VRM heatsink on a budget board isn’t just cosmetic its absence tells you something. When a board ships without any heatsink over the power delivery components, the manufacturer is signaling that those components don’t generate enough heat to need one. That’s either because the VRM is so efficient it runs cool, or because it’s so underpowered that it’s never pushed hard enough to matter. On a $70 board, it’s almost always the latter.
The practical implication: If you’re running a mid-range CPU at stock clocks for gaming, a budget board is genuinely fine. The VRM will never be stressed. But if you’re pushing a high-TDP processor, overclocking, or running sustained workloads (video encoding, 3D rendering), VRM quality is the real cost driver not the RGB headers, not the heatsink aesthetics.
Why the Motherboard Decides Your CPU’s Future
The CPU socket is the most consequential decision you make when choosing a motherboard, and most first-time builders don’t realize it until it’s too late.
Every CPU requires a specific socket type. The socket determines the physical pin arrangement and the electrical interface between the processor and the board. Intel and AMD use completely different socket designs, and they change them every few generations.
Current sockets (2024–2025):
- Intel LGA1700: Supports 12th, 13th, and 14th generation Core processors. Intel has confirmed LGA1851 for 15th gen (Arrow Lake), meaning LGA1700 is end-of-life for new CPUs.
- AMD AM5: Supports Ryzen 7000, 8000, and 9000 series. AMD has committed to AM5 support through at least 2027, which means one or two more CPU generations on the same board.
Socket lock-in is the decision that haunts you three years later when you want to upgrade your CPU but your board doesn’t support the new generation. You’re not just buying a board you’re buying into a platform with a defined upgrade ceiling.
This is why AMD’s AM5 platform has attracted significant attention from builders who want upgrade flexibility. It’s not that AMD CPUs are always better; it’s that the socket longevity means a board bought today can likely run a CPU released in 2026.
One more thing worth knowing: a CPU socket update doesn’t always mean a chipset update. You can sometimes use a new CPU on an older board with a BIOS update but only within the same socket generation. Once the socket changes, the board is incompatible regardless of firmware.
I’ve watched builders spend $400 on a CPU and $80 on a motherboard, then wonder why their system is unstable under load. The board wasn’t defective. The VRM just couldn’t keep up. The CPU was asking for 180W and the board was delivering something closer to 160W with a 200mV sag. The CPU throttled. The builder blamed the CPU. The CPU was fine.
What Happens in the First Three Seconds After You Press Power
Most people have no idea what the motherboard does before Windows loads. It’s actually doing a lot.
When power reaches the board, the UEFI firmware activates immediately. It runs POST the Power-On Self-Test which checks that critical hardware is present and functional. The sequence looks roughly like this:
- CPU initialization — the UEFI checks that the CPU is recognized and responding
- Memory training — the firmware tests RAM modules, sets timings, and verifies stability
- Storage enumeration — detects connected drives (SATA, M.2, NVMe)
- PCIe device detection — identifies GPU and other expansion cards
- Peripheral initialization — USB, audio, networking
- Bootloader handoff — the firmware finds your OS bootloader on the designated boot drive and passes control
The whole process takes 1–3 seconds on modern systems with fast SSDs. On older systems with HDDs and legacy BIOS, it could take 30+ seconds.
When POST fails which it will at some point in every builder’s life the board communicates the failure through debug LEDs or a POST code display. Most mid-range and high-end boards have four LEDs labeled CPU, DRAM, VGA, and BOOT. Whichever one stays lit tells you which initialization stage failed.
When your system won’t POST and you’re staring at a black screen at midnight, those four LEDs are worth more than any troubleshooting guide. They tell you exactly which component the board couldn’t initialize.
MotherBoard Form Factors: Size Has Consequences
Motherboards come in standardized sizes called form factors. The size you choose determines your case options, expansion slot count, and cooling flexibility.
| Form Factor | Dimensions | RAM Slots | PCIe Slots | Best Use Case |
|---|---|---|---|---|
| ATX | 305 × 244 mm | 4 | 3–7 | Full builds; maximum flexibility |
| Micro-ATX | 244 × 244 mm | 2–4 | 2–4 | Smaller cases; budget builds |
| Mini-ITX | 170 × 170 mm | 2 | 1 | Compact builds; HTPCs |
| E-ATX | 305 × 330 mm | 4–8 | 4–7 | Workstations; HEDT platforms |
ATX is the default for most builds four RAM slots, multiple PCIe slots, and compatibility with the widest range of cases and cooling solutions. It’s not exciting, but it’s the right choice when you’re not sure what you’ll need later.
Micro-ATX makes sense for budget builds where you know you won’t need more than one GPU and one NVMe drive. The boards are cheaper, the cases are smaller, and the trade-offs are minimal for most users.
Mini-ITX is where people get into trouble. The form factor looks great on a desk. Then you realize you have one PCIe slot (GPU takes it), two RAM slots (limits future upgrades), and almost no room for airflow. Mini-ITX builds work, but they require deliberate planning you can’t just throw any cooler and any GPU at them and expect things to fit.
UEFI vs BIOS: The Terminology Everyone Gets Wrong
Every article on this topic says “BIOS.” Most of them are technically wrong.
BIOS (Basic Input/Output System) is the original firmware standard from the 1970s. It’s 16-bit, limited to 1MB of addressable memory, and can only boot from drives smaller than 2.2TB using MBR partitioning. It was adequate for decades. It’s not adequate for modern hardware.
UEFI (Unified Extensible Firmware Interface) replaced legacy BIOS as the standard for new motherboards starting around 2011–2012. UEFI is 32/64-bit, supports drives larger than 2.2TB using GPT partitioning, boots faster, includes a graphical interface, and supports features like Secure Boot and TPM 2.0 (required for Windows 11).
The reason everyone still says “BIOS” is that motherboard manufacturers kept the label. The key you press to access UEFI settings is still called the “BIOS key.” The settings menu is still called the “BIOS menu.” But the underlying firmware is UEFI on any board made after 2012.
This distinction matters practically when you’re setting up a new build. Windows 11 requires UEFI with Secure Boot enabled if your board is running in “legacy BIOS mode” (CSM mode), Windows 11 won’t install. It’s a 30-second fix in the firmware settings, but only if you know the distinction exists.
The most underrated feature on any motherboard is BIOS Flashback the ability to update firmware using a USB drive without a CPU or RAM installed. It sounds niche until you buy a new CPU that’s incompatible with the current firmware and you have no way to update it without a working system. Some manufacturers include this on budget boards. Others charge you $50 more for it. It’s the kind of feature you’ll never use until the one time you desperately need it, and then you’ll wish you’d paid attention to the spec sheet.
Does It Matter How Much You Spend? A Practical Framework
There’s no universal answer, but there is a decision framework.
Spend less if:
- You’re running a CPU at stock clocks
- You don’t plan to overclock RAM beyond XMP/DOCP profiles
- You need one GPU slot and two storage connections
- Your build is for general use, light gaming, or office work
Spend more if:
- You’re using a high-TDP CPU (150W+ sustained)
- You plan to overclock the CPU or push memory speeds beyond 6000 MT/s
- You need multiple M.2 slots, USB4, or Thunderbolt
- You want a longer upgrade path (better socket longevity, more BIOS update support)
The honest truth is that most $150–$200 boards from reputable manufacturers (ASUS, MSI, Gigabyte, ASRock) are more than adequate for 90% of builds. The $300–$500 boards exist for the 10% who are extracting maximum performance from expensive CPUs or running workstation-class workloads.
Where budget boards genuinely cut corners: VRM quality (fewer phases, lower-rated MOSFETs), PCB layer count (4-layer vs. 6-layer affects signal integrity), thermal design (cheaper or absent VRM heatsinks), and long-term BIOS support (budget boards often stop receiving updates sooner).
Where they don’t cut corners: basic compatibility, standard feature sets, and reliability at stock settings.
The Decision You’re Really Making
When you choose a motherboard, you’re not just buying a circuit board. You’re defining the boundaries of your system which CPU it can run, how fast your memory can go, how many drives you can connect, whether you can overclock, and how many upgrade cycles you’ll get before the platform becomes obsolete.
The motherboard doesn’t make your system fast. The CPU and GPU do that. But the motherboard determines how much of that performance you can access, how stable it runs under pressure, and whether you’ll be replacing the whole platform in two years or just swapping a CPU.
That’s worth understanding before you buy one.
Frequently Asked Questions
What are the main components of a motherboard?
The key components are the CPU socket, RAM slots (DIMM slots), chipset, VRM (Voltage Regulator Module), PCIe slots, M.2 slots, SATA connectors, power connectors (24-pin ATX and 8-pin CPU), BIOS/UEFI chip, and rear I/O ports. Each serves a specific function in connecting, powering, or routing data between system components.
What is a motherboard chipset?
The chipset is a controller chip (or set of chips) on the motherboard that manages data routing between the CPU, RAM, storage, and peripherals. It determines which features are available including overclocking support, PCIe lane count, USB port types, and storage interface options. Chipset tier (B-series vs. Z-series vs. X-series) is one of the primary factors in motherboard pricing.
Can I upgrade my motherboard without replacing my CPU?
Sometimes. If you’re staying within the same socket generation, you may be able to move your CPU to a new board after a BIOS update. But if the new board uses a different socket (which happens when Intel or AMD changes generations), the CPU is incompatible regardless of firmware. Always verify socket compatibility before purchasing.
How many RAM slots does a motherboard have?
It depends on the form factor. ATX and E-ATX boards typically have 4 DIMM slots (supporting up to 128GB with 32GB modules). Micro-ATX boards have 2–4 slots. Mini-ITX boards have exactly 2 slots. Workstation and server boards can have 8 or more.
Do I need an expensive motherboard?
For most builds, no. A $150–$200 board from a reputable manufacturer handles stock-clocked CPUs, standard gaming, and everyday workloads without issue. The price premium on high-end boards pays for better VRM quality (critical for overclocking), more PCIe lanes, additional M.2 slots, and premium features like USB4 or Thunderbolt. Match the board to your actual use case, not your aspirational one.
What does BIOS do on a motherboard?
The BIOS (technically UEFI on modern boards) is firmware stored on a dedicated chip that initializes hardware during startup, runs POST (Power-On Self-Test), and manages system configuration settings. It’s the first software that runs when you power on your PC, before any operating system loads. It also stores settings like boot order, fan curves, memory timings, and overclocking profiles.
What is a motherboard socket?
The CPU socket is the physical interface on the motherboard where the processor is installed. It defines which CPUs are compatible different socket types have different pin arrangements and electrical interfaces. Intel’s current consumer socket is LGA1700; AMD’s is AM5. Choosing a socket means choosing which CPU generations you can use now and in the future.
Kaleem
My name is Kaleem and i am a computer science graduate with 5+ years of experience in Computer science, AI, tech, and web innovation. I founded ValleyAI.net to simplify AI, internet, and computer topics also focus on building useful utility tools. My clear, hands-on content is trusted by 5K+ monthly readers worldwide.