
CPU overheating occurs when your processor sustains temperatures above its safe operating range, triggering automatic performance reductions and, if left unaddressed, contributing to long-term hardware degradation. For most modern desktop processors, the threshold where protective mechanisms kick in sits between 90°C and 100°C . By that point, your system has likely already been running slower than it should for some time.
The processor is the single component most sensitive to heat. Every modern CPU has a specification called Tj Max (Thermal Junction Maximum). It is the highest temperature the processor die is rated to tolerate before the hardware automatically throttles or shuts down to protect itself. Intel desktop CPUs generally have a Tj Max of 100°C; AMD’s Tj Max varies by generation, with Ryzen 5000 chips rated to 90°C and Ryzen 7000 chips rated to 95°C.
Reaching Tj Max doesn’t immediately destroy your chip. What you want to avoid is consistently operating near Tj Max, because sustained thermal stress degrades the chip over time.
Diagnosing the cause first matters, because cleaning a PC will not help if the real problem is a misconfigured fan curve.
How to Tell If Your CPU Is Overheating
Before diagnosing causes, confirm you have an overheating problem not a different bottleneck presenting similar symptoms.
Use a monitoring tool first. Task Manager in Windows cannot read CPU core temperatures. You need a third-party tool:
| Tool | Platform | Best for |
|---|---|---|
| HWMonitor | Windows | Per-core temps + voltages |
| Core Temp | Windows | Minimal, core-focused |
| HWiNFO64 | Windows | Most detailed readings |
| MSI Afterburner | Windows | Temps + real-time GPU overlay |
| lm-sensors / Psensor | Linux | Command-line or GUI |
| NZXT CAM | Windows | Dashboard view, AIO cooler integration |
Most tools let you set a temperature alert in HWiNFO64, use the ‘Alert’ tab to notify at 85°C, so you act before throttling begins. The CPU cooling air vs liquid comparison weighs the two cooler types for that setup.
Run your monitoring tool during normal use, then during a heavy task (gaming, video rendering, compiling). Note: idle temperatures, load temperatures, and whether temperatures keep climbing indefinitely versus leveling off.
Temperatures that stabilize under load are normal. When under load, CPU temperature will rise and then stay at a consistent temperature not just keep going up and up. Continuously rising temperatures that never plateau indicate the heatsink is not doing its job. Tom’s Hardware Forum
Physical warning signs:
Fans running at maximum speed with excessive noise, inability to open basic programs, dark screen events, and the system rebooting and shutting off within a short span are all symptoms of CPU overheating.
A CPU consistently reaching 90°C or higher is typically abnormal and a sign to implement one or more remedies. If fans are loud enough that the noise is intrusive, that’s a sign they are either straining to deal with an unusually high temperature or they’re malfunctioning.
Safe CPU Temperature Ranges by Workload
Ranges reflect Intel and AMD official thermal guidelines for consumer desktop CPUs. Most modern CPUs share these baseline safety guidelines: at idle, safe temperatures typically range from 30°C to 50°C. Under moderate gaming loads, 60°C to 85°C is normal for modern CPUs. Heavy rendering can reach 90°C+ as expected boost behavior on current generations. Occasional spikes to 90°C are acceptable in isolated bursts, but prolonged exposure at that level can impact longevity.
A critical nuance for AMD Ryzen 7000 users: AMD Ryzen 7000 chips routinely operate at 90°C+ under load AMD explicitly states this is expected behavior due to the aggressive Precision Boost algorithm maximizing performance within the power envelope. If you upgraded from a Ryzen 3000 chip and your temperatures jumped significantly, that’s largely architectural, not a problem with your cooling. What would be concerning on a Ryzen 7000 chip is hitting 95°C at idle or light tasks.
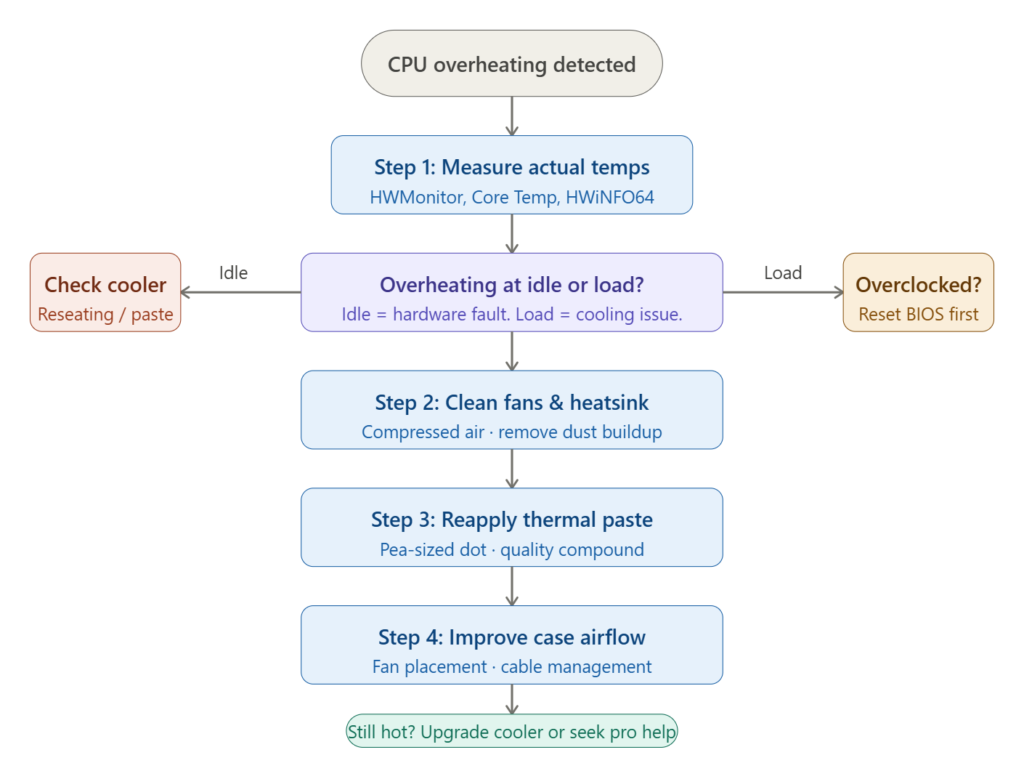
The idle vs load distinction is your primary triage step. Overheating at idle almost always points to a hardware problem a disconnected fan, failed pump, or improperly seated cooler. Overheating only under load points to insufficient cooling capacity or thermal interface issues. Overheating immediately on startup (before load) typically points to a disconnected fan header, unseated cooler, or BIOS reset to aggressive defaults not software.
| CPU State | “Old School” CPUs (Pre-2020) | Modern CPUs (Intel 13/14th Gen, Ryzen 70/90) | Verdict |
|---|---|---|---|
| Idle (Desktop) | 30°C – 40°C | 35°C – 45°C | Completely Normal |
| Gaming (Medium Load) | 60°C – 75°C | 70°C – 85°C | Safe / Optimal |
| Heavy Rendering (100% Load) | 80°C – 85°C | 90°C – 100°C | Expected (Boost Behavior) |
| Any Load | 90°C+ | 105°C+ | Overheating (Action Required) |
Is 90°C Too Hot for a CPU?
It depends on the processor and workload. AMD Ryzen 7000 series is designed to run up to 95°C under load, so 90°C is expected behavior. For older Intel chips, sustained 90°C under heavy load is at the upper edge and warrants cooling improvements. Idle temperatures at 90°C are always abnormal, regardless of model.
A common root cause is a cooler chosen against the TDP rating without understanding what that number really covers.
What Causes CPU Overheating: A Root-Cause Framework
Rather than a flat list of causes, use this triage sequence. The causes are ordered by how frequently they’re responsible and by how easy they are to confirm.
1. Dust Buildup Blocking Airflow
The CPU cooler is the first line of defense against overheating, and over time, it can get clogged with dust, hair, and debris. This buildup blocks airflow, preventing the cooler from doing its job effectively. The heatsink fins not just the fan blades accumulate the most insulating dust, and this is where heat transfer occurs.
For laptops, blocked intake vents (usually on the bottom) cause faster temperature escalation than desktop equivalents due to limited airflow volume. Placing a laptop directly on a blanket, bed, or sofa impedes airflow from the bottom vents where the cooling system exhausts air. Avast
2. Degraded or Incorrectly Applied Thermal Paste
Thermal paste is the compound filling microscopic air gaps between the CPU die and the heatsink base. When it dries out, cracks, or was applied incorrectly, heat transfer drops significantly. Thermal paste should be replaced every two to three years, or sooner if you notice your CPU is running hotter than usual.
Overapplication is as problematic as under-application. Be careful not to apply too much thermal paste roughly the size of a grain of rice or a pea is sufficient. Excess paste can cause overheating by trapping air bubbles or allowing paste to migrate onto socket contacts.
3. Cooling System Failure (Fan, Pump, or Mount)
A fan can fail in three distinct ways, each requiring a different response:
- Complete disconnect: The fan doesn’t spin at all. Usually caused by a cable being unplugged check the CPU_FAN header on the motherboard.
- Mechanical degradation: The fan spins slowly or makes clicking/grinding sounds. Bearings are failing; replacement needed.
- Incorrect fan curve: The fan is physically functional but configured to run too slowly for the thermal load. When the CPU fan spins up as intended but you’re still having overheating issues, the fan curve on your PC may simply not be aggressive enough. This is adjustable in BIOS.
For AIO liquid coolers, pump failure causes rapid temperature spikes even with the fans spinning normally.
4. Overclocking Without Adequate Cooling
Overclocking increases the CPU’s clock speed to boost performance, but it also generates significantly more heat. Reverting to default clock settings by accessing your BIOS/UEFI and resetting the CPU multiplier or base clock to original values can help reduce temperatures.
If BIOS access is unavailable or your system is unstable, you can remove the CMOS battery, a circular metallic object on the motherboard. Press the tiny metal tab on the side to release it. Leave it out for a couple of minutes, then reinsert it to reset all BIOS settings to default.
For Intel 13th and 14th Gen users, one specific issue matters. In 2024, Intel acknowledged a microcode and power management issue affecting high-end 13th and 14th Gen desktop CPUs. It caused instability at voltages above the intended range. Intel released a BIOS microcode patch to address this. If you own an i9-13900K/KS or i9-14900K/KS and are experiencing thermal instability, verify your motherboard has the latest BIOS update before pursuing other fixes.
5. Poor Case Airflow Design
Even a fully functional fan can’t maintain airflow if there’s something in the way. Cables routed across fan paths are a common culprit. The physics of case cooling require a pressure differential cool air in from the front/bottom, hot air exhausted from the rear/top.
Counter-intuitive fact: Don’t try to improve ventilation by removing side panels. This alters the internal pressure balance, making it even harder for the fans to maintain sufficient airflow, and allows dust to build up faster inside the machine.
Case pressure matters. A setup where intake fans exceed exhaust creates positive pressure useful for dust control but if exhaust is zero (as in the Reddit H510i case thread), heat traps internally. Aim for neutral or slight positive with at least one rear exhaust.
Room temperature sets the floor for every CPU temperature in an air-cooled PC. When intake air rises from 22°C to 35°C, load temperature rises by roughly 13°C if cooler performance stays unchanged. The cooler can only move heat into air that is already warm. A PC inside a closed cabinet or against a heating vent inherits that warm intake air. Moving the case into cooler room air is a fix in its own right.
6. Software-Side Causes
Viruses and malware such as spyware or cryptojackers can cause overheating by running hidden processes that consume excessive system resources these malicious programs often operate in the background, forcing the CPU to work harder.
Outdated software can lead to overheating by causing inefficient resource management and increased system strain. Older applications may not optimize hardware usage effectively, forcing the CPU and memory to work harder. AVG
Update motherboard BIOS and chipset drivers periodically outdated firmware can mismanage voltage and fan control, generating excess heat even on stock settings.
7. The Plastic Peel Mistake
In testing labs, the number one cause of instant overheating on newly built PCs is the user forgetting to peel the transparent plastic protective film off the bottom of the CPU cooler before installation. This acts as a perfect thermal insulator, trapping all heat inside the chip.
The diagram shows the full temperature spectrum and the practical meaning of each zone.
When the PC shuts down or shows a CPU over temperature error
A sudden shutdown under load, or a boot message reading “CPU over temperature error”, means the processor already crossed its protection limit. The protection worked. The mistake after it is restarting straight away and loading the same task again, because the cooler is still heat-soaked and the temperature climbs back to the limit faster on the second run.
Should I keep restarting to get back into Windows? No. Power the PC down, switch it off at the wall, and leave it for ten minutes so the heatsink and the case air cool to room temperature. Restarting into a heavy task while the cooler is still hot gives the processor no headroom at all.
- Power down and leave the PC off for ten minutes, with the case in open room air.
- On the next boot, enter the BIOS or UEFI hardware monitor and read the idle CPU temperature there. An idle reading above 60°C on a desktop points to a cooler contact or fan problem.
- If the BIOS reading is normal, boot normally and open a monitoring tool before running any heavy task. Watch whether the temperature climbs steadily without levelling off: a steady climb points to airflow or cooler capacity, while a spike within seconds of load points to a pump or mount failure.
- If the error repeats at boot with the fans spinning, check the cooler mount and the fan and pump headers before changing any software setting. A cooler that shifted during a move, or a pump header set to a silent curve, produces exactly this symptom.
A PC that shuts down only under one game or one render job, and never at idle, is a different case from a PC that will not boot past the error. The first points to cooler capacity or a power limit under sustained load. The second points to a cooler that is not making contact or not running at all.
How to Fix an Overheating CPU: Step-by-Step
Follow these steps in order. Do the cheap, reversible fixes first.
Clean Your Cooling System
What you need: Can of compressed air, soft brush (optional), isopropyl alcohol (90%+) for thermal paste removal.
- Power off completely and unplug from the wall. For desktops, switch off the PSU rear switch and press the power button once to discharge capacitors.
- Open the case. Never work on a powered system.
- Hold fan blades still with a finger or pencil before spraying compressed air free-spinning fans can generate back-current through the motor.
- Spray in short bursts through the heatsink fins, fan blades, and case vents.
- For laptops, blow through intake vents on the bottom. If your laptop model allows disassembly, cleaning the heatsink-fan assembly directly provides far better results.
Expected result: If dust was the primary cause, temperatures should drop by 5–15°C after cleaning.
Reapply Thermal Paste
- Remove the CPU cooler.
- Clean residual paste from both the CPU IHS (integrated heat spreader) and heatsink base using isopropyl alcohol and a lint-free cloth or coffee filter.
- Apply a pea-sized dot of new thermal paste to the center of the CPU. Do not spread it the cooler’s mounting pressure distributes it.
- Remount the cooler, tightening the mounting screws in a cross pattern to ensure even pressure.
- Verify the cooler is firmly seated with no wobble.
Recommended thermal pastes: Arctic MX-6, Noctua NT-H2, Thermal Grizzly Kryonaut (for high-end builds). Avoid generic compound that ships with budget coolers quality compound can reduce temperatures by 3–6°C.
Check and Optimize Your Fan Curve
Your BIOS controls how aggressively your fans respond to temperature increases. Most motherboards ship with conservative curves that prioritize silence over cooling.
- Access BIOS during startup (typically Del, F2, or F10).
- Navigate to the fan control section (often labeled “Smart Fan,” “Q-Fan Control,” or “Fan Xpert”).
- Set the CPU fan to ramp to 60–70% speed at 60°C and 80%+ at 75°C.
- For AIO coolers, configure the pump header to run at 100% speed continuously. Pumps generate minimal noise and should not be throttled.
This is an underused fix. A CPU fan running at 40% when it should be at 80% creates significant temperature differences without requiring any new hardware.
Improve Case Airflow
Optimal configuration for a mid-tower:
- 1–2 intake fans at front (or bottom)
- 1 exhaust fan at rear
- 1–2 exhaust fans at top (optional, for high-heat builds)
Organize cables inside the case to avoid blocking airflow. Use cable ties or Velcro straps to keep them neat and out of the way. A bundle of cables in front of the CPU fan can reduce airflow more than a partially failed fan.
Ensure the PC is not placed inside a desk enclosure, against a wall with no clearance, or near a heat source. The ambient temperature of the room has a significant impact on CPU temperatures. A 5°C increase in room temperature can raise CPU temperatures by 3–5°C.
Reduce CPU Load (Temporary or Software-Side Fix)
Open Task Manager (Ctrl + Shift + Esc on Windows or Activity Monitor on Mac) to see which processes are using the most CPU resources. Close resource-intensive programs, and disable programs on startup by typing “Startup apps” in the Windows search bar and toggling off apps you don’t want to launch automatically.
For Windows users with persistent thermal issues, reducing the maximum processor state is a temporary measure:
- Search “Edit power plan” in the taskbar.
- Select “Advanced power settings.”
- Expand “Processor power management” → “Maximum processor state.”
- Reduce to 90% for both “On battery” and “Plugged in.”
This can lead to reduced app performance, so it’s only a temporary solution while you arrange a permanent hardware fix.
Upgrade Your Cooling Solution
If all previous steps have been completed and temperatures remain unacceptable, the cooler itself is insufficient for your CPU’s TDP.
Stock coolers vs aftermarket: Intel and AMD bundle stock coolers adequate for operation at base clocks but not sustained boost clocks under heavy loads. A $20–40 air cooler (Cooler Master Hyper 212 Evo, be quiet! Pure Rock 2) can cut peak temperatures by 15–25°C on a mid-range CPU.
Air cooler vs AIO liquid cooler:
| Factor | Quality Air Cooler | 240mm AIO Liquid |
|---|---|---|
| Cooling performance | Excellent (within 3–5°C of AIO) | Best for sustained loads |
| Noise at load | Moderate | Low |
| Reliability | Very high (no pump to fail) | Moderate (pump lifespan: 5–7 years) |
| Installation difficulty | Moderate | Moderate–high |
| Best for | Mid to high-end CPUs | Overclocked / HEDT / small form factor |
All-in-one liquid coolers come in different sizes 120mm, 240mm, and 360mm with larger radiators providing better cooling potential, provided the case has the space to accommodate them. TechRadar
Dead pump or dead fan: tell them apart in two minutes
A failed fan and a failed pump look alike from the outside: temperatures climb and the PC throttles. The checks below separate them without opening the cooler, and the distinction decides whether the fix is a 15-minute fan swap or a cooler replacement.
| Check | Dead or failing fan | Dead or failing pump |
|---|---|---|
| Fan blades | Stopped, slow, or grinding | Spinning normally |
| Pump vibration | Not relevant, air cooler has no pump | No vibration felt on the pump housing or tubes |
| Tube temperatures | Not relevant | One tube hot, the other near room temperature, or both tubes cold while the CPU reads very hot |
| Temperature climb | Steady climb over minutes | Spike within seconds to a few minutes of load |
| Noise | Clicking or grinding from the fan hub | Silence where a faint pump hum used to be, or a rattling pump |
| Fix | Replace the fan | Replace the cooler, since sealed pumps are not a serviceable part |
Two cautions apply to the tube check. Touch tubes only briefly, and never open a sealed liquid cooler to inspect the pump. A sealed unit that has lost its pump is a replacement job, and opening it risks a leak onto powered parts.
Power limits and undervolting: lower the heat at the source
Cooling removes heat. Power limits and undervolting reduce how much heat the processor makes in the first place, which is why they belong early in a fix sequence. Every desktop processor has two BIOS power limits: PL1 caps sustained watts, and PL2 caps short boost watts. A motherboard set to Auto can apply limits above the processor maker recommendation, and that extra wattage turns directly into extra heat under sustained load. Setting PL1 and PL2 to the maker values for the installed processor removes that excess without touching clock speeds.
Does lowering voltage always cost performance? A small cut usually costs nothing measurable, because the processor still runs at the same clock speed on slightly less voltage. A large cut causes crashes under load, which is the signal to step the voltage back up. Test each step with a sustained load and a temperature reading, and keep the smallest cut that holds a stable load temperature.
The size of the effect follows a simple calculation. Processor power scales with the square of voltage, so a 5% voltage cut removes about 10% of the power. Take a processor drawing 150W at 1.20V. Cutting voltage to 1.14V gives 150 x (1.14 / 1.20) squared, which is 150 x 0.9025 = 135.4W. The cooler then has about 15W less heat to remove, before any clock speed change. The same arithmetic explains a cooler mismatch: a cooler rated at 125W against a processor boosting to 180W leaves a 55W shortfall, and no amount of paste or fan speed closes a gap of that size.
Power delivery and power limits are separate jobs. The power supply unit must be able to deliver the watts the system asks for, but it does not set the processor power limit. That limit lives in the BIOS, which is where an Auto setting that exceeds the maker recommendation gets corrected.
The Long-Term Damage Picture: What Sustained Overheating Does Over Time
The primary damage mechanism from sustained high temperatures is electromigration the gradual displacement of metal atoms in transistors and interconnects under the heat and current density of heavy operation. This is cumulative and irreversible. The processor doesn’t fail all at once; it becomes progressively less stable over time, first showing intermittent crashes under load, then at lighter tasks, until it fails entirely.
A CPU under thermal throttling can perform up to 50% below its maximum capability depending on severity. Consistently operating near thermal limits accelerates wear on electronic components, shortening the CPU’s lifespan and potentially affecting nearby parts like the motherboard, RAM, and power supply.
The thermal shock dimension: Repeated temperature cycling running hot during sessions and cooling down completely between stresses solder joints and contact points through differential expansion. This is the documented mechanism behind the 2011 MacBook Pro GPU failure wave. The problem wasn’t any single overheating event; it was thousands of heat cycles degrading BGA solder connections incrementally.
Throttling prevents damage in the moment, but long-term overheating still reduces component lifespan. If your system is throttling regularly, it is operating beyond what your cooling solution was designed for and the fix is the cooling system.
Laptop-Specific Overheating: Different Problem, Different Approach
Laptop cooling works differently from desktop cooling, and generic desktop advice can cause harm if applied incorrectly.
What you can do:
- Use the laptop on a hard, flat surface never on fabric that blocks bottom vents.
- A quality laptop cooling pad (with active fans) can reduce temperatures by 5–10°C.
- Compressed air through external vents helps, but disassembling the laptop for direct heatsink cleaning provides substantially better results for units over 2 years old.
- Many laptops have an “undervolting” option via tools like Intel XTU or AMD Ryzen Master, which reduces heat output without meaningful performance loss.
- Enabling “Eco mode” or “Power Saving” in your operating system’s power profile reduces sustained CPU TDP.
Avoid these moves:
- Do not prop the laptop on objects that block the exhaust vent (usually at the rear hinge area).
- Do not use laptop cooling pads with fans pointing downward at a bottom-vented laptop, you are fighting the natural airflow direction.
- Do not attempt to replace thermal paste on a thin-and-light laptop unless you are confident in disassembly the cooling assembly on ultrathin models is tightly integrated with fragile components.
Thin and light laptops are particularly prone to overheating because their compact design leaves little room for airflow. Laptop CPUs often have a lower Tj Max of around 90–100°C than their desktop equivalents, so exceeding this range more quickly increases the risk of damage.
Preventive Maintenance Schedule
Most CPU overheating problems are preventable. A realistic maintenance cadence follows:
| Task | Frequency |
|---|---|
| Clean heatsink and case fans with compressed air | Every 6 months (3 months for pet owners) |
| Check CPU temps under load with monitoring software | Every 3 months |
| Verify fan curves in BIOS are still set correctly | After BIOS updates |
| Reapply thermal paste | Every 2–3 years, or if temps have risen noticeably |
| Inspect cooler mounting for looseness | After any case transportation or hardware installation |
| Clean laptop vents externally | Every 3–6 months |
| Full laptop heatsink disassembly clean | Every 2 years for heavy users |
Frequently Asked Questions About CPU Overheating
Should thermal paste be replaced on a brand-new PC?
No. Factory paste on a new cooler is fresh, and replacing it gains nothing. Check two things on a new build instead: the plastic peel is removed from the cooler base, and the cooler mount is tightened evenly. A new PC that overheats almost always has a mount or peel problem, not old paste.
Can a CPU cooler be too large for a case?
Yes. A tower cooler can exceed case height clearance, and a wide cooler can clash with tall memory modules. Check the case maker maximum cooler height and the cooler width against the memory slot position before buying. A cooler that forces the side panel off, or presses against memory, is the wrong size for that case.
Does a sealed liquid cooler ever need refilling?
No. A sealed all-in-one unit is filled at the factory and has no user-serviceable refill point. Slow fluid loss over years is one reason pump lifespan sits around 5 to 7 years. A custom loop with a reservoir is a different design, and that design does need periodic topping up.
Why is one core hotter than the rest?
Cores do not share work evenly. The operating system schedules heavy threads onto preferred cores, and those cores run hotter than idle neighbours. A gap of 5 to 10 degrees between cores under load is normal. A single core sitting 20 degrees above the rest at idle points to a sensor or mount issue worth checking.
Is a short fan burst at startup a fault?
No. Most motherboards spin fans at full speed for a few seconds at power-on as a self-test, then settle to the configured curve. A burst that never settles, or a fan that stays at full speed at idle, points to a curve setting or a temperature reading problem, not to the startup burst itself.
Can I read CPU temperature without installing any software?
Yes. Enter the BIOS or UEFI setup during startup, usually with Del, F2, or F10, and open the hardware monitor page. It shows the CPU temperature at idle. It cannot show load temperature, since no heavy task runs inside setup, so a monitoring tool is still needed for the load reading.

Kaleem
Kaleem is a Computer Science graduate (Virtual University of Pakistan) and the founder and editor of Valley AI, where he publishes in-depth, tested guides on computer hardware, artificial intelligence, and how the internet works. Every guide is researched from primary sources, tested hands-on where possible, and updated when the facts change.