
Upgrading RAM is usually a simple hardware job. The risky part comes earlier: buying the wrong DDR generation, overlooking soldered laptop memory, or adding modules when every slot is already occupied.
Use this sequence:
- Confirm that RAM is causing the slowdown.
- Check whether the computer supports an upgrade.
- Choose the correct capacity, generation, and form factor.
- Install the memory for a desktop or laptop.
- Verify stability before relying on the upgrade.
RAM compatibility depends on the exact motherboard, CPU platform, laptop model, and BIOS/UEFI version. Use this guide to narrow the right upgrade, then confirm the final specifications in your manufacturer’s documentation.
Before You Upgrade RAM, Prove That Memory Is the Problem
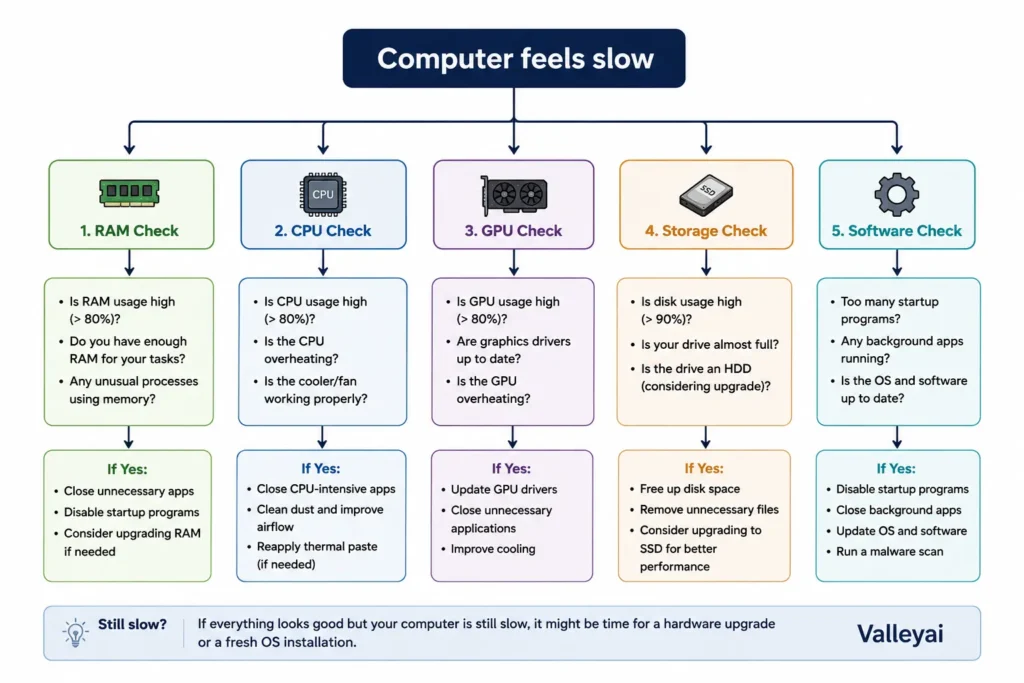
A RAM upgrade helps most when the computer is running short of physical memory and using storage as a fallback.
On Windows, open Task Manager with Ctrl + Shift + Esc, select Performance, and choose Memory. Watch memory usage while performing the task that feels slow. Also check whether the slowdown occurs alongside heavy disk activity, application reloads, or browser tab refreshes.
High memory usage alone does not prove that more RAM is needed. Windows uses available memory for caching, and background applications can consume RAM without causing a serious performance limit.
Consider an upgrade when you regularly see:
- Applications slowing down while several programs are open
- Browser tabs reloading after switching between them
- Game stutter when background applications are running
- Video-editing, development, or virtual-machine workloads exhausting available memory
- Heavy disk activity that coincides with memory pressure and slow response
A RAM upgrade will not automatically fix a graphics bottleneck, processor bottleneck, failing storage drive, malware infection, or poorly optimized application.
The Five-Minute RAM Compatibility Check
The correct RAM must match the computer’s memory generation, physical form factor, supported capacity, and slot configuration.
1. Identify the computer or motherboard model
For a prebuilt desktop or laptop, find the exact model number on the chassis, system information screen, or manufacturer’s support page. For a custom desktop, identify the motherboard model and CPU.
Manufacturer specifications are more reliable than a retailer listing because the same computer family may ship with different motherboards or memory configurations.
2. Confirm the DDR generation
DDR4 and DDR5 are different memory generations. A DDR4 module cannot be installed in a DDR5 motherboard, and a DDR5 module cannot be installed in a DDR4 motherboard.
Do not identify the generation by appearance alone. Check the motherboard manual, laptop service manual, or manufacturer specification page. A tool such as CPU-Z or HWiNFO can help identify the installed memory, but the system documentation should make the final compatibility decision.
3. Match the physical form factor
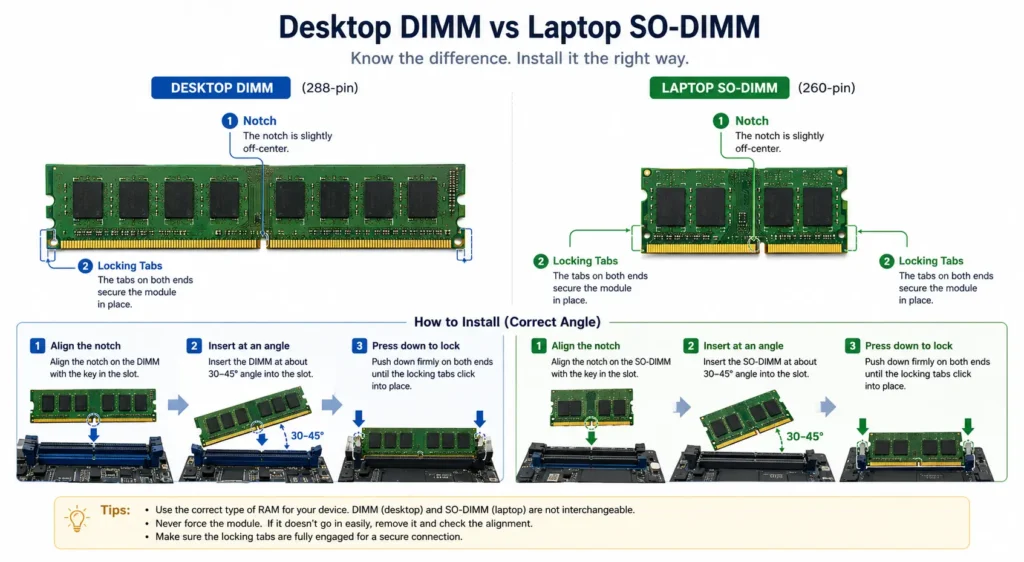
Desktop computers generally use DIMM memory. Laptops generally use smaller SO-DIMM modules.
| System | Typical memory type | What to check |
|---|---|---|
| Desktop tower | DIMM | DDR generation, slot count, capacity, speed |
| Small-form-factor desktop | DIMM or proprietary module | Chassis and motherboard documentation |
| Laptop with removable RAM | SO-DIMM | Slot access, maximum capacity, supported DDR generation |
| Laptop with soldered RAM | Permanently attached memory | Whether an additional slot exists |
| All-in-one computer | Model-dependent | Manufacturer service instructions |
Never force a desktop DIMM into a laptop SO-DIMM slot. The length and key position are different.
4. Check maximum capacity and occupied slots
The motherboard or laptop specification should tell you the maximum supported memory and the number of slots. A two-slot computer with two existing modules may require a complete replacement rather than an addition.
Use this decision rule:
- Empty slot available: You may be able to add a compatible module.
- All slots occupied: Replace existing modules with a higher-capacity kit.
- One soldered module plus one open slot: Add a compatible SO-DIMM if the manufacturer allows it.
- Only soldered memory: A conventional RAM upgrade is not possible.
- Unclear capacity limit: Stop and check the official manual before buying.
5. Decide whether to add or replace
Adding memory is convenient, but a matched kit is often the safer choice when replacing modules. Mixed modules can work at conservative settings, yet combinations that boot at default settings may become unstable when Intel XMP or AMD EXPO is enabled.
For a dual-channel desktop, two matching modules are commonly easier to configure than four mixed modules. Follow the slot order printed in the motherboard manual because slot recommendations vary by board.
How Much RAM Should You Install?
The right RAM capacity depends on the workload, not a universal “more is always better” rule.
| Workload | Practical starting point | When more may help |
|---|---|---|
| Web, email, office work | 8–16 GB | Large browser sessions or frequent multitasking |
| Modern gaming | 16 GB | Streaming, mods, background apps, or demanding newer games |
| Photo editing | 16–32 GB | Large files, batch processing, and several creative apps |
| Video editing | 32 GB or more | High-resolution footage, effects, and complex timelines |
| Software development | 16–32 GB | Large projects, containers, emulators, or virtual machines |
| Virtual machines | 32 GB or more | Multiple guests or memory-heavy guest systems |
Moving from 8 GB to 16 GB can reduce paging for a busy everyday computer. Moving from 16 GB to 32 GB is more workload-dependent. A computer used for email and a few browser tabs may show little benefit, while a system running a game, streaming software, a browser, and voice chat may benefit noticeably.
Capacity does not replace memory speed, CPU performance, GPU performance, or storage speed. Choose capacity first, then confirm the platform’s supported speed and configuration.
How to Upgrade RAM in a Desktop PC
Installing RAM in a desktop requires shutting down the computer, disconnecting power, removing the case panel, and fully seating the modules in the correct motherboard slots.
1. Prepare the workspace
You need:
- The compatible RAM modules
- A clean, stable work surface
- A Phillips screwdriver if the case requires one
- The desktop’s motherboard manual
- An anti-static wrist strap, if available
Shut down Windows normally. Turn off the power supply switch, disconnect the power cable, and unplug attached peripherals if they obstruct access.
Press and hold the desktop’s power button for several seconds after disconnecting power. The step helps discharge residual power from the system, but it does not replace safe handling practices.
2. Open the case and locate the RAM slots
Remove the appropriate side panel and locate the long memory slots beside the CPU socket. Each slot has a notch that matches the key in the RAM module.
Before removing existing RAM, take a quick photo of the current arrangement. That photograph can help you restore the original configuration if troubleshooting becomes necessary.
3. Remove existing modules
Push down the locking tabs at the ends of the occupied slot. Some motherboards have a locking tab on only one side.
Lift the module by its edges. Avoid touching the gold contacts because fingerprints, oils, and debris can interfere with a clean connection.
4. Install the new RAM
Open the locking tabs on the target slots. Align the module’s notch with the raised key in the slot. The module should line up naturally; never rotate or force it into position.
Press evenly on both ends until the locking tabs close around the module. RAM can require more pressure than a first-time installer expects, but uneven force is a warning sign. If the tabs do not close, remove the module and check the alignment.
For two modules, use the motherboard’s recommended paired slots. On many boards, the recommended arrangement is not the two slots directly next to each other, so follow the manual rather than guessing.
5. Close the case and start the computer
Reinstall the side panel, reconnect the power cable, and switch on the power supply. The first boot may take longer than usual while the motherboard detects and trains the new memory configuration.
Do not repeatedly force the system off during the first boot unless the manufacturer’s diagnostic indicators show a clear failure. If the computer eventually displays an image, enter BIOS/UEFI and confirm the total installed capacity.
How to Upgrade RAM in a Laptop
A laptop RAM upgrade is possible only when the laptop has removable SO-DIMM slots and the manufacturer supports user-replaceable memory.
1. Confirm that the memory is removable
Some laptops use soldered RAM. Soldered RAM is permanently attached to the laptop motherboard and cannot be removed through a normal memory upgrade.
Other designs combine soldered memory with one removable SO-DIMM slot. The laptop service manual should identify the configuration, supported capacity, and approved replacement procedure.
Do not open a laptop simply because a product listing advertises compatible SO-DIMM memory. Confirm the exact laptop model first.
2. Shut down and disconnect the laptop
Turn off the laptop completely rather than placing it in sleep mode. Disconnect the charger and all peripherals.
If the service manual permits battery disconnection, disconnect the internal battery before touching the memory. Some laptops include an external removable battery; remove it according to the manufacturer’s instructions.
A laptop chassis can contain delicate clips and short ribbon cables. Opening the bottom cover may also affect warranty terms on some systems, so check the manufacturer’s service policy before proceeding.
3. Remove the bottom cover
Use the correct screwdriver and keep the screws organized by location. Screw lengths can differ, and installing a long screw in the wrong position can damage internal components.
Locate the SO-DIMM slot. The memory module is usually held at an angle by side clips.
4. Replace or add the SO-DIMM
To remove an existing SO-DIMM, gently release the side clips. The module should lift to an angle, allowing you to slide it out by the edges.
To install the replacement, align the notch with the slot key and slide the gold edge into the connector at an angle. Press the module downward until the side clips lock into place.
A laptop SO-DIMM should sit flat after installation. If the module remains raised or the clips do not engage, remove it and check the alignment.
5. Reassemble and verify
Reconnect the battery if it was disconnected, reinstall the bottom cover, and start the laptop. Confirm the installed memory in BIOS/UEFI and Windows.
If the laptop does not start, disconnect power again and check that the SO-DIMM is fully seated. Some models require a longer first boot after a memory change, but repeated failed starts require troubleshooting rather than waiting indefinitely.
What to Configure After Installing RAM
BIOS/UEFI normally detects newly installed RAM automatically, but the memory may initially run at a standard default speed.
Enter BIOS/UEFI if you need to confirm:
- Total installed capacity
- Detected module count
- Configured memory speed
- Active memory profile
- Hardware warnings or diagnostic messages
Intel XMP and AMD EXPO are firmware profiles that can configure supported memory settings beyond basic defaults. Intel describes XMP as a memory-profile technology for compatible platforms, while AMD provides EXPO for supported Ryzen platforms and memory configurations (Intel XMP support, AMD EXPO technology).
Enabling a profile is optional. The computer should boot at a supported default configuration without XMP or EXPO. If instability begins after enabling a profile, return to default settings before testing the modules individually.
A BIOS update is not automatically required for every RAM upgrade. Check the motherboard or laptop manufacturer’s release notes before updating firmware.
Verify the Upgrade Before Calling It Successful
A successful RAM upgrade requires more than a computer reaching the Windows desktop.
Check the following:
- BIOS/UEFI: Confirm the expected total capacity.
- Windows Task Manager: Open Performance > Memory and compare the installed amount with the specification.
- System Information: Search Windows for
System Informationand review the installed physical memory. - Normal workload: Open the programs that previously caused slowdowns.
- Stability test: Run a memory diagnostic if the system crashes, freezes, or behaves unusually.
Microsoft provides Windows memory diagnostic tools and support documentation through Microsoft Support. For deeper testing, MemTest86 can boot independently of Windows and check memory for errors.
Windows may report slightly less usable memory than the physically installed amount because hardware and firmware can reserve part of the address space. A small difference is not automatically evidence of defective RAM. A large difference, missing module, or incorrect BIOS total deserves further investigation.
Fix RAM Upgrade Problems in the Right Order
Most failed RAM upgrades can be investigated without immediately replacing every component.
| Symptom | First check | Next action |
|---|---|---|
| No display after installation | Module seating and notch alignment | Test one module in the recommended slot |
| Computer repeatedly restarts | Memory training or unstable configuration | Wait through one boot attempt, then restore BIOS defaults |
| Only part of the RAM appears | BIOS detection, slot seating, and capacity limit | Test each module separately |
| Windows crashes under load | Mixed modules or unstable profile | Disable XMP/EXPO and run a memory test |
| RAM runs below advertised speed | Default firmware configuration | Check supported profile and platform limits |
| One stick is not detected | Slot or module problem | Move the same module through approved slots |
Reseat the modules
Power down, disconnect the system, and remove and reinstall each module. Check that the locking tabs close fully.
A module that looks installed may still be slightly out of position. That small gap can produce a black screen or partial-capacity detection.
Test one module at a time
Install one module in the motherboard’s recommended single-module slot. If the computer starts, shut it down and test the other module using the same slot.
This process separates a defective module from a defective slot or incompatible combination. Keep the variables controlled: change one module or one slot at a time.
Restore default BIOS settings
If the system fails only after enabling XMP or EXPO, disable the profile and retest at default settings. Mixed modules, older firmware, and platform limits can prevent an advertised profile from working reliably.
Clear CMOS only when simpler steps fail and the motherboard documentation explains the correct procedure. Record custom BIOS settings first because a reset may restore fan, boot, storage, and other configuration values.
Read motherboard diagnostic signals
A motherboard’s debug LED, beep code, or diagnostic display can identify a memory-related POST failure. The meaning varies by manufacturer, so use the exact motherboard manual rather than assuming every “memory” light indicates defective RAM.
RAM Upgrade FAQs
Can I add new RAM to my existing RAM?
You can add RAM only if the computer has an open compatible slot and the combined modules fit the motherboard or laptop’s supported configuration. Matching capacity, DDR generation, form factor, and voltage reduces compatibility risk. If every slot is occupied, you generally need to replace the existing modules with a larger kit instead of adding another stick.
Do RAM sticks need to be the same brand?
RAM sticks do not always need to share a brand, but matching modules are usually easier to configure and test. Modules should match the required DDR generation, form factor, capacity, and supported specifications. Different brands may run together at default settings yet become unstable when XMP or EXPO is enabled, so a matched kit is the lower-risk choice.
Can I mix different RAM speeds?
Different RAM speeds may operate together, but the system commonly configures all modules around the slowest supported settings. Actual behavior depends on the motherboard, CPU memory controller, firmware, and module combination. Mixing speeds can also make an advertised XMP or EXPO profile unreliable. When stability matters, use a matched kit listed for the platform.
Will installing RAM delete my files?
Installing or replacing RAM does not erase files stored on an SSD or hard drive. RAM is temporary working memory, while personal files remain on storage. Shut down the computer before opening the case or laptop, and avoid touching storage components unnecessarily. If the system fails to boot afterward, troubleshoot the memory installation rather than reinstalling the operating system.
Do I need to enable XMP or EXPO after installing RAM?
You do not need to enable XMP or EXPO for the computer to use the new RAM. BIOS/UEFI can run compatible memory at standard settings automatically. An XMP or EXPO profile may provide a higher tested configuration on supported hardware, but stability is more important than the advertised number. Disable the profile if crashes or boot failures begin.
Why does my computer take longer to start after a RAM upgrade?
Some motherboards perform memory training after a change in the installed modules or memory settings. During training, the computer may take longer to display an image or restart once before completing POST. Allow one full boot attempt and watch the motherboard’s diagnostic indicators. Repeated loops, error lights, or a persistent black screen require reseating and single-module testing.
Can I upgrade a laptop with soldered RAM?
Soldered RAM cannot be removed or replaced through a normal SO-DIMM installation because the memory is attached directly to the laptop motherboard. Some laptops combine soldered memory with an open slot, allowing a partial upgrade. Check the exact service manual before purchasing memory; a laptop product family may include both upgradeable and non-upgradeable configurations.

Kaleem
My name is Kaleem and i am a computer science graduate with 5+ years of experience in Computer science, AI, tech, and web innovation. I founded ValleyAI.net to simplify AI, internet, and computer topics also focus on building useful utility tools. My clear, hands-on content is trusted by 5K+ monthly readers worldwide.