
In today’s post, we will discuss How to clean thermal paste off CPU and its pins safely in 5 easy steps.
A thermal compound is a substance that is used to fill in the voids between the CPU and heatsink. When you apply thermal paste, It will maintain your CPU temperature and lower heat dissipation. It helps to ensure that your CPU doesn’t overheat or get damaged as a result of overheating.
If you have an old PC with an outdated motherboard or processor, then removing the old thermal paste might be necessary before applying the new thermal paste onto your CPU.
When the CPU is overclocked, the heat from the processor can cause the paste to heat up and start to melt. This can cause the CPU pins to become hot and necessary to be cleaning.
Let’s explore how to remove the old thermal paste from your CPU using different methods and tools so that you can replace it with fresh new thermal paste!
What is thermal paste?
Thermal paste, or thermal interface material (TIM), is a liquid that improves the heat transfer between the CPU and its heat sink. It’s made of a silicone base and filled with metal particles. The metal particles conduct heat from your CPU to your heatsink (or water cooler).
What is a thermal paste used for?
Thermal paste is a thin layer of chemicals that helps transfer heat from the CPU to a heat sink. It’s applied between the CPU and the heat sink, allowing it to cool down faster than without it. If you have a thermal paste on your CPU, remove it before cleaning out any dust or debris stuck in there.
How to clean thermal paste off CPU?
- Use a microfiber cloth or Q-tip to apply rubbing isopropyl alcohol to the CPU.
- Let it sit for a few minutes until you see some bubbles appearing on top of your thermal paste layer (you can use an oilcan or small spoon if you want).
- Remove the alcohol with a dry cloth and repeat until all of your thermal paste is gone.
- Use a hairdryer to heat up the CPU and remove any residual thermal paste that may be left on top of it. The hotter you get, the quicker this will go so use caution!
- Pour a small amount of warm water onto a cloth and clean the paste off of the CPU.
- Use a vacuum cleaner to suck the paste off of the CPU.
- Use a paper towel to dry the CPU and reapply the thermal paste.
How to clean thermal paste off CPU pins?
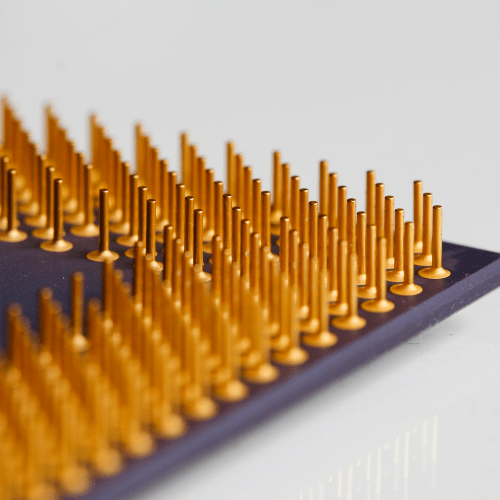
When it comes to removing thermal paste from the pins of your CPU, you have a few options. You can use an eraser, Clean the pins with an eraser to remove any residual thermal paste that may be left on them after you’ve cleaned up your CPU Socket pins.
You can use either a microfiber cloth dipped in rubbing alcohol or isopropyl alcohol, depending on what you have on hand. Be sure that the area being cleaned is dry before proceeding; if it’s not, use a damp paper towel or cloth to wipe away any remaining thermal paste residue from both sides of each CPU pin, and then let it air-dry completely before reassembling your computer system again.
But it’s important not to use one that’s too big because you’ll have trouble getting all the way down into those little nooks and crannies. Use something like an old toothpick or pencil instead—it will be easier for you to get at those corners without causing any damage or heating up your CPU.
You can also use a razor blade or toothbrush if you want more control over where you’re removing the old paste and what kind of surface material will be left behind after cleaning.
You should also keep in mind that using solvents on sensitive components can cause damage over time and void warranties; therefore, only use them if absolutely necessary (e.g., if there aren’t any other options available).
How to remove old thermal paste step by step?
It’s important to know the way to remove old thermal paste before applying a new thermal compound. If you want to clean the old thermal paste from your CPU surface, you’ll need some sort of chemical-based thermal paste cleaner. There are many options for this, but one of the most popular thermal paste removals is Arctic Silver.
Step 1
First, remove the Cpu Cooler from its mounting bracket by loosening its screws and sliding it out of place.
Step 2
The second step is to remove the CPU from its socket. To do this, you’ll have to unscrew it from its bracket and then pop off the heat sink or fan that’s attached to it. Once you’ve done this, set aside both parts because we’re going to clean up some dust later on when we need them back in place.
Step 3
There are two ways to approach this: either use an eraser like this one I found at Office Depot ($9) or just use cotton swabs dipped into alcohol instead!
If you want an even better option than these standard tools though, there’s one more thing that will work wonders: alcohol-dipped microfiber cloth is excellent at getting into deep crevices and removing even stubborn thermal pastes from hard-to-reach spots on your computer’s motherboard (which is where most processors usually have their heat sinks attached).
Next, use a cloth dipped in water or rubbing alcohol to wipe down both sides of each pin individually—this way you can get up close and personal with all six pins without having access issues (or accidentally damaging them).
Now you should be able to turn your attention back toward cleaning up those pins on top of your CPU—the ones that connect it with other components like RAM modules or graphics cards (if applicable).
If neither option works out well for whatever reason (like if they’re too thick), go ahead and grab another pair of tweezers so that everything can fit comfortably under microscope-level magnification while being cleaned off carefully without causing damage at all times during each step along the way towards success…
Step 4
Now you’re ready to clean the paste off. First, Pull the CPU back out with a pair of tweezers. Make sure that it doesn’t fall down again (if it does, pick it up). Set it aside and don’t touch your hands with the thermal paste until after washing them!
Step 5
After you’ve cleaned off the excess thermal compound. Once they’re nice and clean again, it’s time to apply a new layer of thermal paste. Please remember thermal paste does not leak to the motherboard socket otherwise it will short your system.
Reassemble everything back up again so that when re-installing them into their sockets later on down the road they’ll be easier than ever before!
Use a cotton swab or paper towel to wipe away any residue on top of your CPU. Then, put it back in its case and let it sit for about 15 minutes before re-inserting it into your computer.
After this step, When your CPU’s thermal paste dried out. Your computer should be ready for normal use!
Conclusion
That’s it! You’ve successfully cleaned off your CPU. Now you can get back to work again on your pc.
Kaleem
My name is Kaleem and i am a computer science graduate with 5+ years of experience in Computer science, AI, tech, and web innovation. I founded ValleyAI.net to simplify AI, internet, and computer topics also focus on building useful utility tools. My clear, hands-on content is trusted by 5K+ monthly readers worldwide.