

You’re crouched inside a mini-ITX case, a thumb-sized M.2 NVMe SSD pinched between tweezers, and the standoff screw has already rolled into the PSU shroud twice. That scenario is where most installations go sideways not because the hardware is hard, but because the sequence is unforgiving.
What Is an M.2 NVMe Slot
The M.2 NVMe SSD is a small-form-factor storage device that installs directly into a dedicated motherboard connector called the M.2 PCIe slot. The NVMe (Non-Volatile Memory Express) protocol operates over the PCIe (Peripheral Component Interconnect Express) lane interface to move data at speeds no SATA SSD can match. The M.2 form factor specification defines the physical keying: an M-key notch on the connector ensures the M.2 NVMe SSD only seats in a compatible slot.
Pre-Install Safety: Killing Residual Power
Before touching the M.2 PCIe slot, switch off the power supply and pull the power cable from the wall. Hold the power button for 10 seconds to drain capacitor residue from the motherboard. This step is non-negotiable. A charged capacitor can fry the M.2 NVMe SSD controller the moment metal meets the slot.
The 30° insertion angle feels counterintuitive because the M.2 PCIe slot connector looks flush but if you feel resistance past the first 2mm, the standoff height is wrong, not the drive.
Physical Installation: The 30° Seating Rule
The M.2 NVMe SSD must be inserted at a 30° angle into the M.2 PCIe slot before any screw is tightened. Slide the gold edge connector into the M.2 PCIe slot, then rotate the drive down toward the standoff. Secure the standoff screw by hand first, then a quarter-turn with a precision screwdriver.
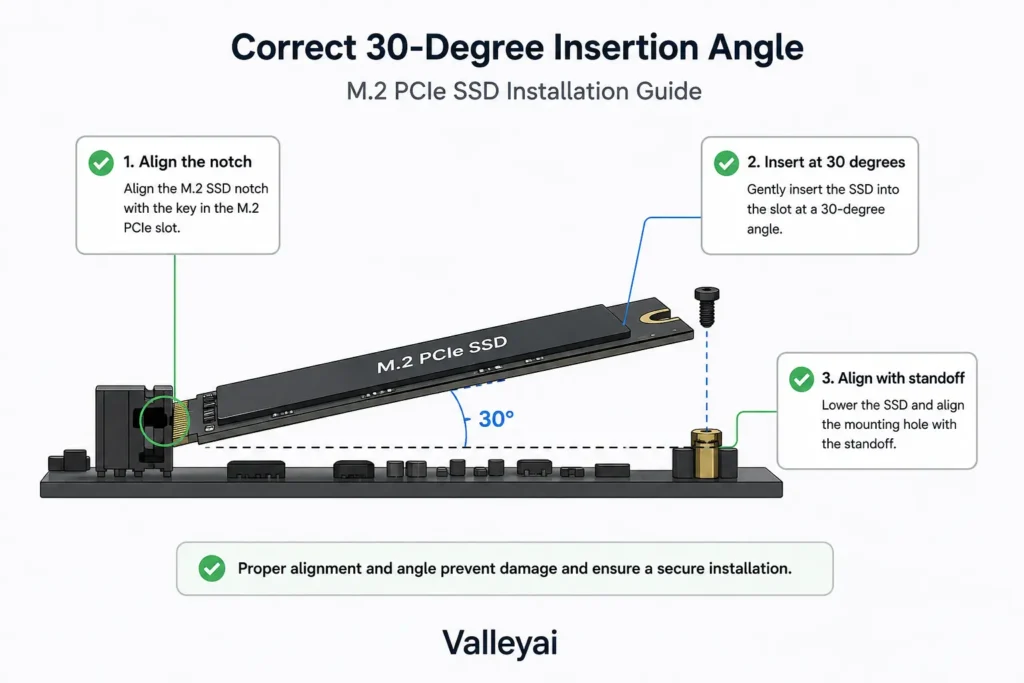
Most forum replies tell you to push the drive flat first. You can’t. The connector geometry demands the angle, and forcing it parallel will crack the PCB near the notch.
Which M.2 Slot Actually Matters: CPU-Linked vs Chipset-Linked PCIe Lanes
The primary M.2 PCIe slot nearest the CPU socket uses CPU-linked PCIe lanes, delivering full bandwidth with lowest latency. Secondary slots route through the chipset (a PCIe switch), adding a hop that costs throughput. The NVMe protocol saturates CPU-linked lanes far more efficiently than chipset-routed ones on modern boards.
Most users install the M.2 NVMe SSD in the secondary chipset-linked slot by default, leaving 20–30% bandwidth unused on modern PCIe 4.0 motherboards.
On a Gigabyte or ASUS motherboard, the top slot is almost always CPU-linked. Check the silk-screen label: “M2_1” near the CPU is your performance tier. The M.2 NVMe SSD in that slot talks directly to the processor via the root complex, avoiding the chipset switch entirely.
Heatsink First or Screw First? Thermal Hardware Sequencing
The M.2 NVMe SSD heatsink must be mounted before the drive is fully secured to avoid thermal pad misalignment. If you screw the drive down first, the heatsink’s thermal pad won’t contact the NAND flash evenly, creating hot spots that trigger throttling.
Peel the thermal pad backing, lay the heatsink bracket on the M.2 NVMe SSD, then seat both into the M.2 PCIe slot together on boards with pre-installed mounts. On boards requiring separate standoffs, mount the standoff, insert the drive, add the heatsink, then secure.
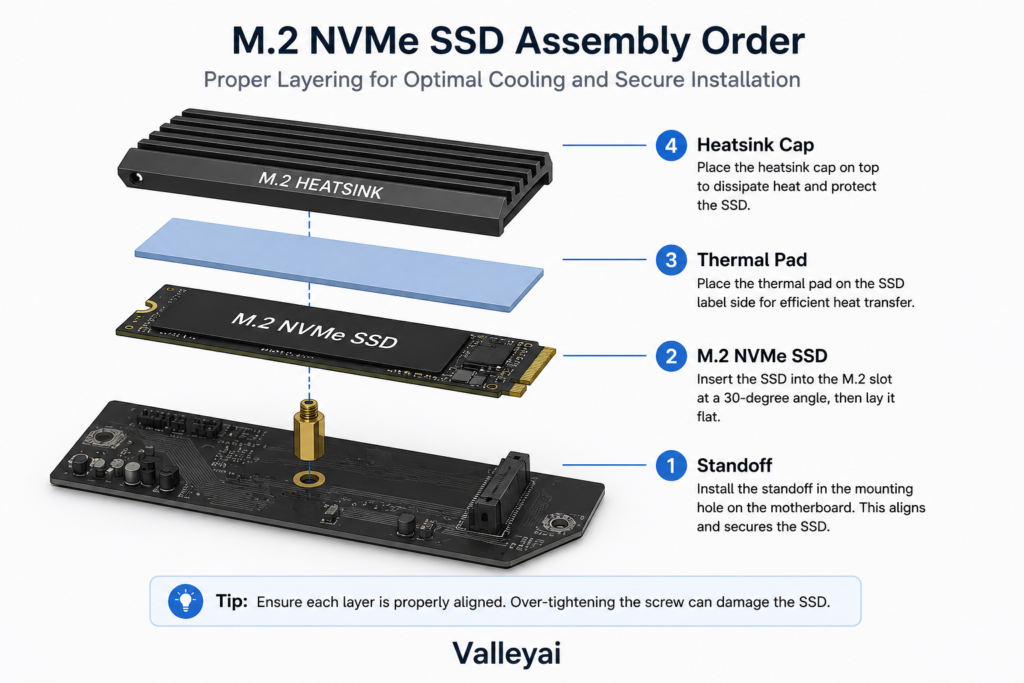
On AsRock boards, the pre-installed M.2 standoff strips if you use a standard Phillips #1 instead of the included tiny hex key I’ve ruined two standoffs this way before switching to OEM tools only.
Initializing the Drive in Windows 11 Disk Management
The Windows Disk Management utility configures the GPT partition table on a new M.2 NVMe SSD so the OS can write data. After physical install, boot into Windows 11, right-click the Start button, open Disk Management, and initialize the disk as GPT per Microsoft’s official disk guidance.
Microsoft’s documentation requires GPT for drives over 2TB, but using GPT on every M.2 NVMe SSD avoids legacy MBR limits entirely. Create a new simple volume, format as NTFS, and assign a letter. The Windows Disk Management utility handles this without third-party cloning tools for a fresh OS or storage volume.
Drive Not Detected? Post-Install Debug Framework
If the M.2 NVMe SSD fails BIOS detection, the cause is rarely the hardware. Check these in order:
- Reseat the drive — the 30° angle was missed and the connector is half-engaged.
- Confirm the standoff screw isn’t over-torqued (strips the mount and lifts the PCB).
- Enable “Above 4G Decoding” in ASUS UEFI buried three menus deep.
I’ve seen BIOS fail to detect a perfectly seated M.2 NVMe SSD simply because the user forgot to enable “Above 4G Decoding” in the ASUS UEFI. The drive was fine; the firmware just hid it.
Installing NVMe in a PS5 or Without a Native Slot
The PS5 M.2 SSD bay requires specific length and heat dissipation compliance per Sony’s official SSD documentation. Remove the side plate, unscrew the bay cover, insert the M.2 NVMe SSD at the angle, and secure the spacer matching your drive length (2230–22110).
No M.2 PCIe slot on your board? A PCIe x4 adapter card mimics the slot using chipset lanes. The M.2 NVMe SSD performs nearly identically on PCIe 3.0+ adapters for gaming loads because the NVMe protocol communicates directly through the PCIe lane interface.
Magnetic screwdrivers are routinely feared in build forums, but they pose negligible risk to solid-state NAND storage compared to ancient inductive HDD platters.
Your Install Decision Framework
Choose the CPU-linked M.2 PCIe slot first, seat at 30° before thinking about screws, and mount the heatsink before final torque. If the M.2 NVMe SSD vanishes from BIOS, blame the UEFI setting before the hardware. That sequence is the difference between a five-minute win and a Friday-night teardown.
Frequently Asked Questions
How do I install an M.2 SSD with a heatsink?
Mount the thermal pad and heatsink cap onto the M.2 NVMe SSD before final screw-down, or use the board’s pre-installed heatsink that clamps over the seated drive. Misalignment of the thermal pad reduces cooling contact and can prevent the drive from sitting flush in the M.2 PCIe slot. Always verify pad placement against the NAND flash location printed on the drive label before securing the standoff screw.
How do I install an NVMe M.2 SSD in a PS5?
Power off the PS5 completely, remove the faceplate, and unscrew the M.2 bay cover near the fan. Insert the M.2 NVMe SSD at a 30° angle into the console’s M.2 PCIe slot, then move the spacer to match your drive length before securing the screw. Sony requires a heatsink that fits within the bay height limit, or the console will reject the drive at boot.
Why is my M.2 SSD not detected in BIOS after install?
The most common cause is incomplete seating the 30° insertion into the M.2 PCIe slot wasn’t achieved before screw-down. Second, the standoff may be missing, leaving the connector airborne. Third, UEFI settings like “Above 4G Decoding” or “M.2 RAID mode” hide the M.2 NVMe SSD from the boot list even when physically correct, as seen on many ASUS boards.
How do I format and initialize an NVMe SSD in Windows 11?
Open Windows 11 Disk Management from the Start menu, right-click the uninitialized M.2 NVMe SSD, and select GPT partition table. Then create a new simple volume, choose NTFS, and assign a drive letter. The Windows Disk Management utility handles this without third-party tools for any standard NVMe protocol drive, making the storage volume visible in File Explorer immediately.
Which M.2 slot is fastest on my motherboard?
The M.2 PCIe slot labeled near the CPU (often M2_1) uses CPU-linked PCIe lanes and delivers the highest bandwidth with lowest latency. Secondary slots route through the chipset and share bandwidth with SATA or USB controllers. For a PCIe 4.0 M.2 NVMe SSD, the CPU-linked slot preserves full sequential read speeds that chipset slots quietly cap.
Can I install an NVMe SSD without an M.2 slot?
Yes. A PCIe x4 adapter card provides an M.2 PCIe slot using available chassis expansion lanes. The M.2 NVMe SSD performs near-native speeds on PCIe 3.0 or 4.0 adapters because the NVMe protocol communicates directly through the PCIe lane interface. Ensure your board’s BIOS supports NVMe booting if you plan to run the operating system from the adapter card.
Still deciding which drive type suits you? Compare SSD vs HDD.

Kaleem
Kaleem is a Computer Science graduate and the founder of Valley AI (valleyai.net), where he publishes in-depth, tested guides on computers, AI, and internet technologies. Every guide is researched from primary sources and updated regularly.